Monday, June 15, 2009

Getting Organized

Sometimes drawing the line between getting your child everything they want and "you don't need that" is a toughie. Luckily there are a few things that keep my little one happy all the time - cars, crafts and trains. (Not necessarily always in that order). Keeping said things tidy can present it's own set of challenges, but I think I have come up with a solution. You can't imagine how happy I was to hear from a friend that, after seeing my son's toy closet, she was inspired to clean and organize her son's as well.

IMG_5959

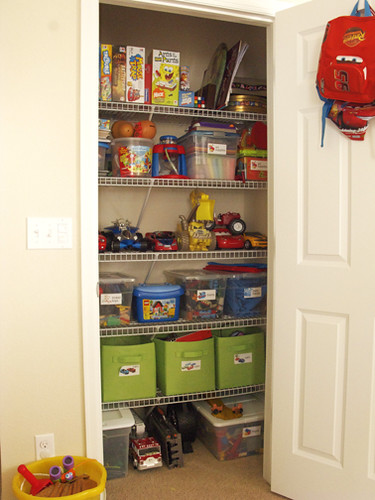
It seems like such a no-brainer now after seeing the closet all put together, I wonder why it took so long to get to this point. Keep in mind this isn't *all* of his toys. There are a few shelves in the playroom for books and cars and a toy box in his bedroom for little odds and ends and stuffed friends. The garage houses the outdoor toys like scooters and sports equipment.

Let me tell you how I set up the closet. The shelves were already built in and the closet is actually supposed to be a linen closet. If I ever get the opportunity I'd like to refit the shelves with the elfa line from the Container Store, but that is a whole other post! So, using what I have, I sorted the toys into containers and placed them with the ones that Z uses most often or doesn't need help/supervision with on the bottom. There are a few extra large bins at the very bottom that he doesn't play with as much, but since the bins are so big and cumbersome I placed them low to make it a bit easier to get out.

IMG_5962

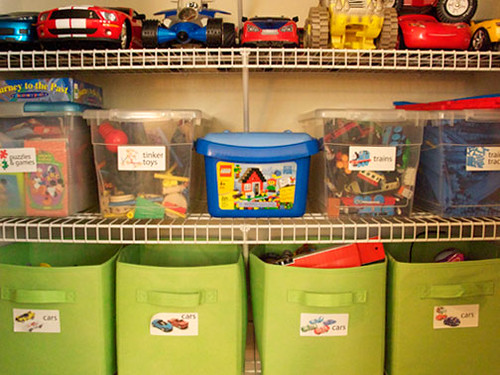
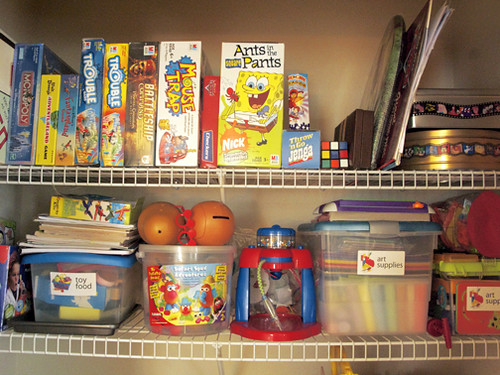
The top holds art supplies, craft kits, board games and items used infrequently. There is also a hook on the door for bags and such. To help keep everything in it's place I made labels for the bins with pictures of the items inside as well as text. Since he can't read yet the picture helps identify what goes inside while the text reinforces the word recognition. I plan on printing out some of the photos you see here in this post to attach to the back of the door. That way, when there is a playing frenzy and a bunch of the bins are out being used he can see from the picture where they belong and put them back in the correct place.

IMG_5960

It's not so much me being OCD (which I have a tendency to be) but rather the hope that everything will return to the same place and actually *fit* in the closet! The biggest challenge will be weeding out old toys to make room for the new. For now there is a little wiggle room.

I hope this inspires you and now you'll want to go organize something! If you do, send me a link to see what you've done!

Friday, June 12, 2009

February Flashback

Hello! Yes, it's been too long between blogs again! I am working on a project that I want to post when I am done with it. But it made me miss my blog and I thought in the meantime I'd post something Zion and I did back in February and I never got a chance to post. Better late than never, right? Or we can look at it like this - it will help you prepare for next valentines... or give you a great rainy-day summer activity to do! Either way, enjoy!

Monkey Valentines
Sweet Crayon Heart & Color-in Valentines!

If you have kids then you have crayons. Millions of them. And if you are a crazy, pack-rat, crafter like myself you keep all the ones your kids get when you go to restaurants too. So you have millions more. They are loving used by your little artistes, they break and then you have billions of broken crayon fragments! Well, for pete sake, DON'T throw them away! There are plenty of great crafty applications for broken crayons and perhaps I'll blog more of those later. But for this little handmade Valentine you melt them in heart shaped molds and make brand new multi-colored heart shaped crayons!. Of course you could use any shape mold, but these *were* for Valentines!

Crayon Hearts Crayon Hearts

They are so easy! Remove the paper from your crayons and break them into tiny pieces. You can use an X-acto blade to slice the logs into smaller pieces. (Parents do this part!) Then let your kiddos pick out the colors to go into each heart. You may have to help persuade them to use a few bright colors along with the dark blue, green and browns. =) Bake them in the oven at 250ยบ for 10-15 minutes or until they are melted but not so liquidly that you get brown sludge. After they cool just pop them out of the molds and rub any rough edges on a scrap piece of paper. Ta-da! Cute muti-colored crayons, perfect for coloring in the valentine.

Card with Crayon

For these cards I printed out sayings with my computer and used Stampin' Up's Sock Money set for the images. The sayings were all monkey related like...

Valentine, You got me Swingin’ on a Vine!
No Monkey-ing around, Be my Valentine!
I’m Banana’s for You!
You’re more fun than a Barrel of Monkeys!
You’re Top Banana!
Just Hangin’ Around, Hoping You’ll be my Valentine!

Then we used the Stampin' Up Top Note die to make the header cards for the packages. Put in a valentine, a crayon heart and staple the header card to acetate bags. Voila!

Finished Cards

I let Z write on the header cards the To's and From's but you could go crazy and decorate that part as well! So many options. Now go dig out your muffin molds and broken crayons and have a ball. Because if it's like it is here, it's raining and the kids need something to do! =)