Showing posts with label crafts. Show all posts

Tuesday, April 19, 2011

Felt Cookies Revisited - Easter Egg Cookies

Several months ago I received a sweet email asking about my felt cookie tutorial and if I would be interested in having my post linked to on her site. That email came from Callye Alvarado of the Sweet Adventures of SugarBelle. She makes the most unbelievably gorgeous cookies - real edible ones - unlike the playthings I have concocted!. I was so blown away by her site that I scoured through it for hours and visit it almost on a a daily basis, because she has new posts almost every day. I'm completely obsessed with her creations and crazy envious of her skill! Check her out!

This post is per her request for a more in-depth tutorial for the the felt cookies and since Easter is a few days away she asked for an Easter themed set. You could apply the same steps for almost any holiday or occasion and make a completely custom set of cookies!

Without further ado!


You'll need:
Egg shaped cookie cutter (or you could use a round cutter and gently reshape it)
2 12X9" pieces of creme colored felt (for dough)
1 12x9"piece of tan felt (for baked cookies)
felt and ric-rac for decorative "icing" (your choice of colors, can use scraps)
buttons & beads for more elaborately decorated eggs (optional)
matching embroidery floss for dough and baked cookies
fabric glue
scissors
needle
polyfil (or stuffing)

DOUGH:


Pin the two sheets of creme felt together and trim around the edges to round corners and make random curves. (like you've rolled out the dough). Stay fairly close to the edges so you have plenty of room for four cookie cutouts. These measurements could be altered to make more or less cookies, I think four make a nice set.


Use the cookie cutter as a template and mash into the "dough" to give you an impression to cut by. Carefully cut out 4 sets of cookies from the "dough", make sure to cut through both layers.


Sew each set of cookie cutouts and the surrounding dough together using a blanket stitch with matching embroidery floss.

BAKED COOKIES:


Use the cookie cutter to make a template on a scrap of lightweight cardboard (raid your recycle bin for a cereal box). Trace the cutter and add about 1/8 to 1/4" extra all around. Cookies expand when they cook you know!

Using template cut out four sets of "cooked cookies" from the darker felt.

Now comes the really fun part - decorating the cookies! =) Use scraps of felt, ric-rac, buttons, beads - you name it and layout designs on your cookie. I used a yellow scrap of felt and two sizes/colors of ric-rac for simplicity. Think about how you like to decorate real eggs and be creative... you could even use felt "icing" all over the top of the cookies like I did with the heart cookies. Or use a completely different color of felt for the entire cookie itself - like a dyed egg!


Use fabric glue or tacky glue to adhere the pieces (or sew them if you use buttons, etc.)


Place on back of cookie and sew together (again with a blanket stitch) with matching floss leaving an opening to stuff. Do not overfill cookie, continue sewing shut.


Voila! Place in an Easter basket with a rolling pin and get ready to whip up some deliciously fun Easter "treats" with the little ones!

Thank you Callye!

Sunday, April 17, 2011

Milk Jug Easter Basket


Easter falls a few days after Earth Day this year so what better way to celebrate both than by making this recycled milk jug basket?! This recycled craft is fast (minus paint dry time) and easy. Better yet, you most likely have everything you need on hand to make one.


You'll need:
cleaned gallon milk jug
measuring tape or ruler
sharpie
small hole punch (1/16th)
x-acto blade
scissors
paint or alcohol ink
large eye needle 
yarn or ribbon

    Directions:
    To get started you'll need to mark your jug where you will be cutting. Measure a consistent distance from the bottom and mark a line with your sharpie all the way around the jug. Be sure to stay under the raised area on the jug.


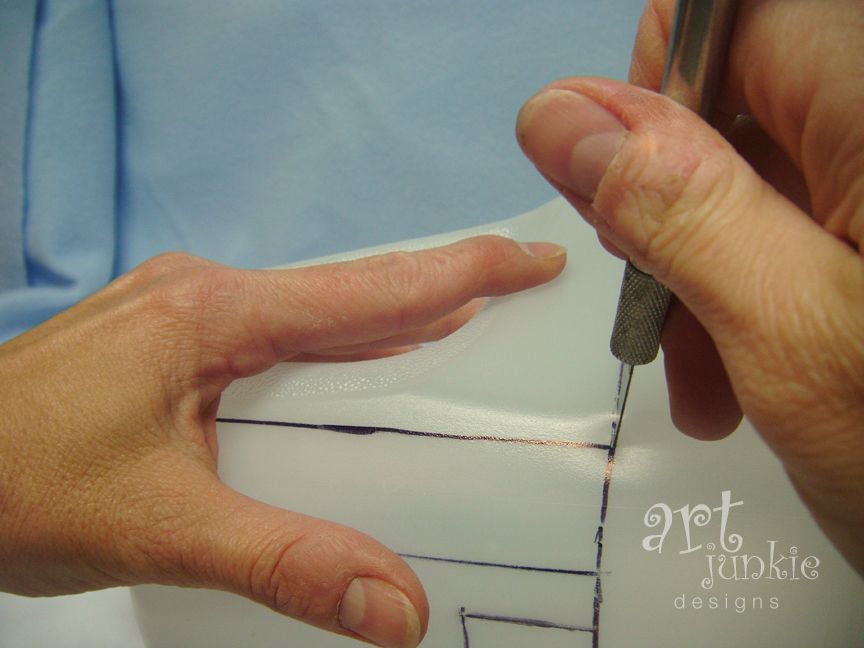
    Next, draw the "handles" on two opposite sides (not the one with the jug handle of course). Use the seam on the jug as a guide and mark about a half inch on each side of the seam, making the handle a total of 1". Use a straight edge if you can or  free-hand the line if you are comfortable. It's a little tricky to hold something on the surface and draw the line at the same time. A second set of hands would be helpful! =)


    Then mark another line 1" above the mark for the height of the basket. This will be the extension for the handle.


    Use your x-acto blade to start the cuts at the handle intersections. Then use the scissors to complete. I found the scissors gave me a little more control than the x-acto blade and you can actually just "slice" through the material with out actually "cutting" if your scissors are really sharp.


    This is what you should have so far... Once these steps are complete you can use your nail to scrape off the sharpie marks or use a solvent if it's stubborn.


    Make a template on a piece of cardstock (or mark directly on the "basket") holes 1/8" from the top and 1/4" apart. all the way around the jug and on all the handles. Start the holes so the first one in the corner is at a 45º angle from the bend. That way the hole will be in the center for the sides and the handle.


    Paint or stain the basket as desired. I found that paint is tricky. Even using paint made for plastic seemed to chip off easily. Perhaps a light sanding and priming would help. Alcohol ink does a great job of coloring the plastic although it's somewhat transparent and I was going for solid. You could coat the surface with glue and glitter it. Of course you could leave it white too. Be creative and experiment on your scraps first.


    Once the paint has dried (if you chose that route), use the needle and thread to sew a "blanket stitch" all the way around the edge of the basket to finish it off. Use two of the holes on each side of the handles with the extension for stability. You could even dab a bit of glue (E6000) on the overlap.


    Finish it out with "grass" made from cut strips of colored card stock run through a "crimper" or strips of newsprint for even more recycled goodness! Place decorative eggs, flowers and other Easter/springy decorations for a centerpiece that does dual duty! 


    I hope you enjoyed this tutorial, and as always, I'd love to see your creations!
    Happy Earth Day, Happy Easter and Happy Spring!


    NOTE: Since this project potentially uses paint/stains that may be harmful to children it should be used for decorative purposes only!

    Wednesday, April 6, 2011

    Earth Day Activities - Post Yours!


    Trying something new here again!

    April 22 is Earth Day. We try to be eco-friendly here all year and I try to implement new ways to go green and minimize our footprint as often as I can. April and Earth Day always bring those thoughts to the forefront and help us remember to renew our efforts.

    We love to use recycled materials in our crafts and I thought it would be fun to turn this post over to you and let you show some of your favorite Earth Friendly activities and projects! So, please check out the linky request below and add your creations! I can't wait to see all the great projects!

    Thursday, December 30, 2010

    Crayola Crayon Maker™: Review

    This is a new direction for me, writing a review post. I am exited about this and I hope to make it a regular part of the blog for the new year!

    I just spent the last few hours with my son making crayons with the Crayola Crayon Maker™. Santa thought that would be a fun activity for Z. Of course he knew I had some ideas about using it as too, and that made it a no brainer! Now, will it live up to the hype and expectations of a 6 year old (box recommends for 8+) and a crafty mom?...


    The machine takes a 60-watt candelabra bulb. No biggie, except the bulbs I had on hand were 25 and 40-watt. So we had to wait for a store run to get the bulb. Wish I had checked that before hand. But the boy was so busy with all his toys on Christmas that waiting for this one wasn't too painful! The bulb is easy to insert. Just a few screws on the top of the machine and you're in. The instructions say do not over tighten. Replace panel and screws and you are ready to go. It's that simple. It's a plug-in unit so there are no batteries. Bonus! You just have to be careful of where you use the unit as it does take about 30 minutes for the melting a cooling process, so it's a good idea to have it somewhere the cord will not be a hindrance.

    First gather all the broken bits of crayons you have. The kit comes with 8 crayon, 2 each of red, yellow, green and blue. But surely you have a pile of pieces! Now here is where I get to interject the "I told you so" from the instructions... it says to only use Crayola crayons in the machine. I had to test that little bit of advice right off the bat. After all, a crayon is a crayon right? Wrong. (Ok, I actually already knew that... but I had to try it anyway to see what would happen =) It's true, the Crayola crayons are a much better product (than those you get from restaurants and dollar store and such). The non-Crayola crayons don't melt as smoothly and end up kind of bubbly and goopy. They don't set as well either. So stick with the Crayola for this machine and use the others for wax-paper stained glass projects! (Hmmm... perhaps another post to come soon with the how-to on that!)

    Ok, so you have your Crayola crayons de-papered, broken into smaller bits if necessary and are ready to go. There are two trays to work with and each makes two 1/2 sized crayons. Just in case you were thinking that you were going to get full sized crayons like the box seems to indicate. A little bit misleading. The kit comes with two holders so you end up with a full sized crayon that can be different colors on each end. I'm hoping that you can get these little holders separately, but on a quick look I didn't find them.


    For each tray you need enough pieces to amount to two full sized crayons. This is where you get to be a little creative with the colors you end up with. You also have to use your basic color mixing knowledge. Red + Yellow = Orange. Blue + Yellow = Green. Red + Blue = Purple. Orange + Blue = Brown. Etc. If you put a wide spectrum of colors together you will get muck every time. The instructions say to use mostly light with a little dark. We used a pretty even amount of Red and Yellow with a hint of Pink in one tray and an even amount of Red and Blue with a hint of Pink in the second.

    Now you are ready to make the crayons! Shut the see-through lid and turn the lever to turn on the bulb and start the melting process. The lid locks at this point so little curious fingers can't open it and get burned. That 60-watt bulb heating up the metal plate and trays does get hot. Adult supervision for little ones is a good idea! Older kids should be able to handle it with no problems. Once the time is set you get to sit there and watch wax melt. =) It takes about 15-20 mins. The instructions say you can give it another 1/2 turn if after the first round if the crayons aren't fully melted. We had to do this with the non-Crayola crayons (don't do that!) but the Crayola melted perfectly in the time allotted.


    Once the timer gets to the part where the bulb turns off it's time to tip your trays up to pour into the molds. Easy! Six year old handled that like a champ! Then you get to wait another 10 mins for the timer to fully stop and the crayons to cool down. The lid unlocks and everything is cool enough to handle. We found that they still weren't quite cool enough to take out of the molds at that point and put them in the fridge for a while. Meanwhile we tore the paper off some more crayons to get ready for the next batch.

    Once the crayons are completely cool, open the mold and the crayons pop right out. Place one piece on each side of the holder and color away! Even though the first batch was made with inferior crayons it was still fun to see what colors came out as you drew. They colors don't perfectly blend together so you get a swirly effect and one minute you are coloring with a dark orange and the next a lighter orange. The purple we mixed went from red-purple to indigo. You have the potential for lots of vivid combinations! Crayola even has some color combinations you can try here Color Recipes

    Over all, I give this little gadget a thumb and a half up. I am reserving the other half for the 1/2 sized crayons. It would have really been fun to have full sized crayons and make your own labels for them. I think the draw of making your own crayons and the "science lab" aspect is super cool. It puts you in the realm of being creative not only with the material output but in the process of making those materials. It's a lesson in mixing color and a real time experiment for "how stuff is made". It does take quite a bit of time to make four half sized crayons buy there will always be broken crayons and rainy or snowy days that need to be occupied!

    I know, I know... a pumpkin? We made orange and purple... of course pumpkins! =)

    If you HURRY you can get a $3 rebate from Crayola. Must be purchased by 12/31. And the Crayon Maker is on sale on the Crayola site for $21.99. Santa got ours at Target for $24.99. You can also check your local hobby stores. Be sure to look for their discount coupons. Hobby Lobby often has 40% off coupons on their web site. Michael's has 40% off mail circulars and Joann has online and flyer coupons, plus they accept both Hobby Lobby and Michael's coupons!

    I hope you have enjoyed this review and found it helpful. If you have or get a Crayola Crayon Maker™ I'd love to hear your thoughts and experience. This post was not sponsored by Crayola®. I have not been paid to write this post. I genuinely wanted to provide my opinion of the product. =)

    Friday, December 10, 2010

    Sweet Holiday Gift

    FullSet

    Need a cute, inexpensive gift for the holidays? Then I've got the perfect solution for you (courtesy of a brilliant idea from my Mother-in-law)! A cut-as-you-go cookie strip complete with scissors to snip the yummy treats . All you need is a roll of cellophane, ribbon, small safety scissors and cookies (pre-made or homemade).

    supplies

    WHAT TO DO:
    Cut out a strip of cellophane long enough for several cookies (5-6) and wide enough to wrap around the cookies about 2 times. This size will vary, depending on the dimensions of the cookies you use. I used small pre-made gingerbread cookies. Leave enough space between the cookies so that it won't crowd them when you add the ribbon. It's a little tricky to roll all the cookies evenly especially if you have a long row. An extra set of helping hands may be needed.

    Step1

    Step2

    Tie ribbon between each of the cookies all the way down the strip including under the last cookie. Leave the top untied - you can seal the top with a creative header card. I used the Stampin Up! Top Note die for the header card itself and a stamp and ribbon to top it off. You can get as creative as you like for that part. The die cut piece is folded and placed over the cellophane and stapled shut. The stamped image covers up the staples.

    Step4 Header
    Top Footer

    Last tie the scissors to the bottom. Voila, you have a perfectly adorable gift and a terrific way to showcase handmade cookies too. Your recipient will have a hard time deciding whether to display or eat your sweet gift!

    Happy Holidays!

    Wednesday, June 2, 2010

    Reniassance Birthday Party

    ZinCastle

    I am not really sure who came up with the idea for Z to have a Renaissance/Dragon birthday party. But I've gotta tell ya, it was a ton of fun to put together! It started out more on the "How to Train Your Dragon" theme, but morphed into Knights and Princesses and general medieval-ness with a few Dragons thrown in for good measure. When I asked Z what he wanted to do for his birthday many, many months ahead of time he asked for a pinata. I thought yeah, ok, we'll see. Then when the theme narrowed down and the dragon aspect had been tossed around I actually found a dragon pinata! I knew the theme could be locked in and we were good to go!

    I started working on his costume in January thinking that 5 months would be plenty of time to get it done. Alas, as I write this it's still not finished. Not to worry, I have a few weeks before the start of the Colorado Renaissance Festival. I plan to have it complete for our yearly visit there. I did, however, make lots of other things for the party like the cake, games and decorations.

    cake

    With great info from Nancy at dabbled.org, Peggy Weaver's fondant recipe and a simple tutorial from FamilyFun.com I had the courage to make the cake myself (and with lots of help and support from my MIL!!! - thank you!). It was so much fun to work on but I have 100X more respect for cake artists. An entire day of work went into that little guy which was promptly gobbled up by a pack of 6 year olds in less than 2 minutes!

    horses

    noodles

    One of the first things I put togther were the Jousting Stick Ponies and Pool Noodle Lances. While searching Family Fun.com for ideas for the cake I found the great section they have on Medieval Party Ideas. One of the games they suggest is an obstacle course type game which requires the horses and lances. I found the stick ponies and the pool noodles at the Dollar Store! Score! To make them more like tournament horses I dressed them with felt "armor" head dresses and embellished with little rhinestones. I also cut off the leads they had on, which looked more western, and replaced with coordinating colors of ribbon. The pool noodles were decorated with crepe streamers (it's what I had on hand, although in hind sight I wish I had used the colored duct tape like FF.com recommends. The streamers fell off after just a little bit of rough play).

    Next we wanted to have games that were somewhat Renaissance authentic. I found several sights with references to games children would have played in medieval times. The games are fairly simple and use simple materials as well so they are super easy to make yourself.

    queek

    The first is a game called Queek. It's played on a checkered surface like chess. The game pieces are stones which are thrown onto the checkered playing area. The Player calls out whether the stone will land on a light or dark square. If it lands on the correct square the player gets a point. The game field is made from a large scrap piece of mat-board. Eventually I'd like to make a larger quilt version. The game pieces are made from small flat-ish stones. There were no references to how many people could play the game so I made six sets of four stones and painted them different colors so it would be easy to tell whose were whose. Once again, Z and I went on a hunt to find as many similarly shaped and sized stones as we could and he had a blast painting them all.

    ringtoss

    Next is a simple game of Ring Toss. It's played just like Horse Shoes. You toss your rings at a stake and ones that land around the stake earn 3 points, touching = 2 points and the ring closest to the stake gets one point. You can play with single players or two teams of two. I made the rings from 3/8" rope from the hardware store. I cut them in lengths of about 30" and twisted them over on themselves. I used hot glue to bind the ends and wrapped tape to secure. Then to make it easy to distinguish each teams rings I cut scrap pieces of fabric (that I used to make the decorative banners with ) and tied over the taped areas. Voila, instant function and flair! The stakes are made with discarded tree branches. One end was whittled into a point so it could easily be driven into the ground. Primitive game play in the most fun way!

    gazebo

    Last but not least, the decorations. Unfortunately I didn't get very good pictures of all the decorations. I made large Royal Banners out of thrifted curtains I cut up, altered and added the Fleur de Lis.

    castle

    The Castle wall was used as part of the "Storming the Castle" section of the obstacle course as well as a fun decoration/prop/photo op booth. It was made from a large cardboard box (from my just-delivered-new futon) which was hinged together and fastened with bolts and painted to look like a stone wall with leftover grey primer I had on hand. I added curtains with the remaining fabric from the banners and tied them back with left over rope pieces from the ring toss game.

    I believe a fun day was had by all and a sweet little Six year old got to celebrate his birthday in Royal Style!

    Sunday, May 9, 2010

    Mother's Day - Fun with rocks

    Who knew rocks could be so cool?


    When Z was 2 we went out to eat breakfast for Mother's Day. Of course there was a wait so we sat outside to enjoy the nice day while we waited. Zion picked up a rock from the parking lot and gave it to me as my present. At first I thought, great, I must have been a bad mom this year. You know, it was a little like getting coal in your stocking.

    I put the rock in my pocket and took it home. Later I placed it on a little tray in the bathroom and laughed about it. Then as time went by I was given pinecones, dandelions and random other artifacts all of which got displayed on that little tray. Over the years, however, the most consistent show of affection was with rocks. I began to realize just how special that first rock really was and I was so glad I put it in my pocket that day.

    Rocks are plentiful around the house nowadays. They are proudly displayed in jars and little vignettes. They have a special place in my heart because a little boy shows me how much he loves me each time he picks out a rock for me.

    Today was totally awesome because we went searching for a special rock together. I told him once he picked it out I'd like him to decorate it for me this year. He decided it needed to be a bumble bee. We found just the right one, he painted and I made the wings. A labor of love I will cherish forever!


    Happy Mother's Day!

    Wednesday, December 2, 2009

    Fun New Christmas Friend

    frosty

    Do you know of Johanna Parker? Well, if you love Halloween and holidays in general and love to decorate with fun knick-knacks then you *must* check out her site and see her lovely creations. I found out about her through Martha Stewart's "Dreamers Into Doers". The timing was amazing, I received the email about Johanna, checked out her website and blog and discovered she was having a Halloween show about a week later in my area! She's here in CO too.

    I was able to go to the show, meet her in person and of course - bring home one of her amazing cat sitter figures (which I just love, love, love!) Johanna is as sweet as her handcrafted goodies and I really enjoyed talking with her about her art and goods! Needless to say, I was feeling very inspired after meeting her and had all kinds of grandios ideas for projects I wanted to try and to interview her for my blog (which I still hope to do... after the holidays, yeah, that's it!!! I'll put it top of the list for next Halloween.) Alas, many other things sucked my attention and the rest of October and November flew by.

    In the back of my mind I couldn't let go of wanting to try papiér mache figures. I put together an armature of balled up pieces of newspaper to make a snowman. He sat on my desk for several weeks while I pondered the best way to go about putting him together. I asked Johanna for a few pointers on what to use and any tips she could offer. It almost felt like asking a magician to reveal her secrets. She was very gracious however, and gave me enough info to dig in and get my hands dirty!

    frosty3

    All I can say is WOW! Playing with papiér mache is F-U-N!!! After a few layers, sanding, painting, altering and making accessories I now have a really cute (IMHO) Johanna inspired Snowman! Not to mention complete respect for her art, craftsmanship and deatil! So, thank you Johanna, for your amazing creations and for sharing!

    She has another show coming up this weekend,if you are in the area go see her. Check out her site for more information and be prepared for papiér mache creatures to take over your decor! Look at the pics from last year's show from her 1939 Cottage house. It's simply spectacular with all the attention to the retro details! I can't wait to see it and bring home more goodies for the holiday season!