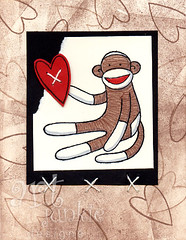
Saturday, September 27, 2008

Card Swapin'

Here are a few of the latest cards for swaps. I love using the brayer and here I've used it on both cards with very different results.


SOCK MONKEY LOVE
Stamp Set: Sock Monkey
Paper: Very Vanilla, Basic Black, Real Red
Ink: Close to Cocoa, Basic Black
Markers: Close to Cocoa, Real Red, Bordering Blue
Tools: Brayer, Sewing Needle
Misc: Stampin’ Dimensionals, Crafting yarn (not Stampin’ Up!)

To achieve background: Run brayer across stamp pad with irregular strokes (so you get hard edges of pad) and roll on paper. (Will take a few passes to cover completely.)

To achieve texture on Monkey: Color with brush end of marker, trying to coat with one pass, quickly. Allow to dry. Use 0.5mm end of same color marker and draw lines back and forth across individual sections of monkey (i.e. head, ears, arm, etc.)

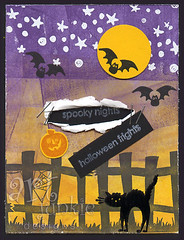
SPOOKY NIGHTS, HALLOWEEN FRIGHTS
Stamp Set: Halloween Frights and Frightful Fence Jumbo Wheel
Paper: Whisper White, Basic Black, Summer Sun
Ink: Basic Black, Pumpkin Pie, Lovely Lilac, Elegant Eggplant, StazOn White, VersaMark
Tools: Brayer, Heat Gun, 1 1/4” Circle Punch
Misc: Embossing Powder (black and white), Stampin’ Dimensionals, Staples

To achieve background: Run brayer across stamp pad in various directions (so you get irregular/hard edges of pad) and roll on Whisper White paper from lightest to darkest color (i.e Summer Sun, Lovely Lilac, Elegant Eggplant.) Go back and forth, up and down to “blend” colors together. As you can see I have some hard edges on this card that didn't get blended thoroughly, but that's what lends hand-made cards their charm =) Clean brayer between colors so you don’t contaminate your ink pads.

Tuesday, September 16, 2008

Halloween Jack

Jack


He's finished!!!! It only took six... or seven years! Ok, so it didn't really take *that* long. But I did start him in 2001 and just had a hard time completing the project. I had done the whole inside part and left off the border, then put him away and promptly forgot about him. And I know myself better now, I should have started at the top and just worked down like a normal person, but I get so excited I need to see the "face" completed. Once I do, I am done. When I do drawings or anything with faces and I complete the face (and sometimes just the eyes) I can't seem to get any further. So, I try to work on the piece as a whole now, or else, I know I'm doomed.

Anyway, I found him by accident not too long ago and decided he needed to be completed for this halloween. He was made by doing a sketch on 16x20 paper, then the outline was traced onto the latch-hook canvas. I blocked out the rough color areas but just sorta felt my way through the details since I didn't transfer any color marks to the canvas. Ta-da! Nice to have you completed Jack!

Sunday, September 14, 2008

More Halloween Fun


treeornaments2 HalloweenTree treeornaments1


Here is a super fun treat basket project that will delight your little Trick-or-Treaters. It can be used for so many occasions, not just Halloween. It's so easy and it's a recycled craft. Love that.

Here is what you'll need:
  • Paper towel or Toilet paper rolls
  • Themed paper and card stock
  • Stamps, punches, adhesive and embellishments (ie. ribbon, brads)

Instructions
  • Cut towel rolls into 2" strips. Use a paper template to trace sections and cut carefully with hobby blade.
  • Cut paper (2 per container) into 6" x 2" strips to adhere to outside, and coordinating stock for inside. (Use strong adhesive like Sticky Strip)
  • Punch or cut 2" circles for the base. Attach to tube with a liquid glue like Tombow or Crystal Effects
  • Cut 3/8" x 5 1/2" strip for handle, punch 1/16" holes in each end and round ends if desired.
  • Punch 1/16" holes in decorated tube and attach handle with brads.
  • Embellish with stamped image cutouts, ribbon, etc.
  • Voila! Fill with candy corn or small treats and hang on tree.

(I made extra stamped medallions to hang on the tree like ornaments as well. Stamps used: Batty for You, Halloween Frights. Paper stock used: Ghostly Greetings. Other Supplies: 1 1/4" circle punch, 1 3/8" circle punch, scallop punch. All products are Stampin' Up!

lumineres

Luminaries. More goodies made from various size tin cans and the same paper set, Ghostly Greetings. Embellished with stamped and punched pieces, ribbon, rub-ons and hodgepodge hardware. Just drop in votives and light up your Halloween! The face of the pumpkin is also a rub on from the Chills & Thrills set from Stampin' Up!

candyjars

Candy Containers. I've used Ghostly Greetings paper agian to wrap a peanut butter container that now houses the creepy eyeball candy. It's used on the individual chocolate bars as well. The possibilities are endless. My family may be sick of candy by the time Halloween really gets here this year. Oh, wait. I have to actually let them eat it to get sick of it. =)

If you decide to make any of the things I've shown send me links! I'd love to see what other people come up with.
Here's to 46 more days until Halloween!

Friday, September 12, 2008

IF - Cool on Your "Island"

IF_island2


My first Illustration Friday piece!!! Woohoo. I've had that link on my site since day one and haven't done one, until now.

Today's word is "Island". It immediately popped the Tori Amos song "Cool on your Island" into my head so it was a perfect spark of inspiration. Although the illustration is not quite indicative of the lyrics... I like excuses to draw my little "Torrey Girl". I hope to make a habit of IFs. Enjoy.

Saturday, September 6, 2008

Monster Hooded Towel

front flat - monster hooded towe


Totally not inventing the wheel here... but thanks to one of my favorite crafty bloggers I knew I'd have to give this a shot. I found some nice towels on sale at Bed Bath and Beyond a few days ago and was purposefully looking at the green ones since it's Z's favorite color. I had forgotten about the post Regina from Creative Kismet had done months ago but when I picked them up for some reason it was kinda like a thump on the forehead, *thunk* and brought it flooding back. It couldn't be more perfect with all the halloween crafting I've been doing too, fits right in.

boo - monster hooded towelback - monster hooded towesitting - monster hooded towe


Z likes it. Although, I think It needs a few modifications. The hood (made from a hand towel) is a bit too large and completely engulfs his head. I made some plain hooded towels with IKEA towels/handtowels and the proportions seem to be more user friendly. Plus, I'd like to embellish a little more by adding claws to the edges. Giving myself ideas... back to the drawing board!

Wednesday, September 3, 2008

Halloween Treats and Cool Colors

m&ms halloween colors HalloweenBottles


Just a quick note on how well the halloween M&Ms match Stampin' Up! colors. (Lovely Lilac, Kiwi Kiss, Only Orange and Basic Black). I've been saving these wine bottles for ever and didn't really know what I was going to do with them. They make lovely candy-holder-decorations.

I've just taken crimped black paper and lightly rubbed a silver ink pad over it to give it a metallic-grungy look. Layered on colored card stock, ribbon and super long twist ties (from toy packaging - again one of those things that looked like something could be done with, so saved...). Little medallions were made with the Stampin' Up! "Batty for you" set and dangle from a loop made with the twist tie. Topped with cork stoppers from the craft store and voila! Very cute Halloween themed decoration.

What a great treat to make for a halloween nut you know! The trick will be not eating all of the candy yourself.

More halloween themed crafts in the works...